


MySpace allows us to set the CSS for the page by selecting their "Customize Profile" menu option, then clicking on "CSS". This brings up a text window where we can edit or paste in the CSS to customize the appearance of your profile.
We'll get started on this by first looking at that high level structure of the Myspace HTML markup. In order to write the CSS, we first need to know what the markup looks like, including what classes and id's we can use in writing our selectors. At a high level, the most important part of the markup structure looks something like this:
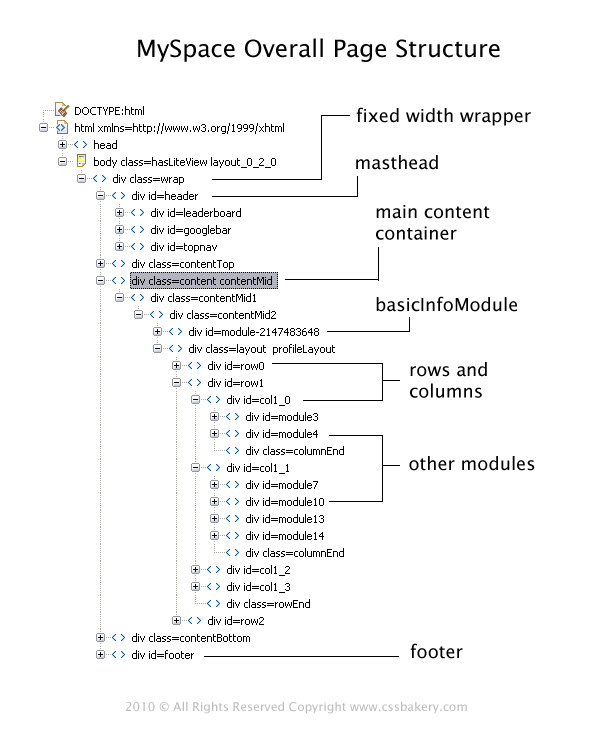
Note that there's a wrapper div that encloses all the page content. At the next level down, there's the header, content, and footer divs. Sandwiched in between header and content, and also between content and footer, you'll see contentTop and contentBottom divs. These two divs don't contain any content at all, just empty divs. That's a good thing for us, since we can write CSS to hook into those empty divs and add some style to the page. You'll see this pattern over and over in the Myspace markup. They'll put in empty divs in various strategic places, just waiting for us to come along and do something with them via CSS.
Looking down one level further, you'll see that the header div has three child divs: leaderboard, googlebar, and topnav. These are for the banner ad at the top of the page, the google search box, and the top navigation menu, repsectively. We'll use these later on in the design we're going to tackle.
The real meat of the page is all contained in the content div. It starts off with a module called the "basicInfoModule" (where your basic personal info goes), followed by a row and column structure that controls the layout of the remaining modules. What's a "module" you ask? Good question, that's our next topic.
MYSPACE MODULES
A Myspace module is a basic block of content that serves some purpose like: your basic personal info, your friends list, the list of schools you've attended, etc.. Each module has a set of container divs that are identical for all modules, but the "body" - the actual content - of the modules are unique from one module to another. The diagram below shows the module markup structure:
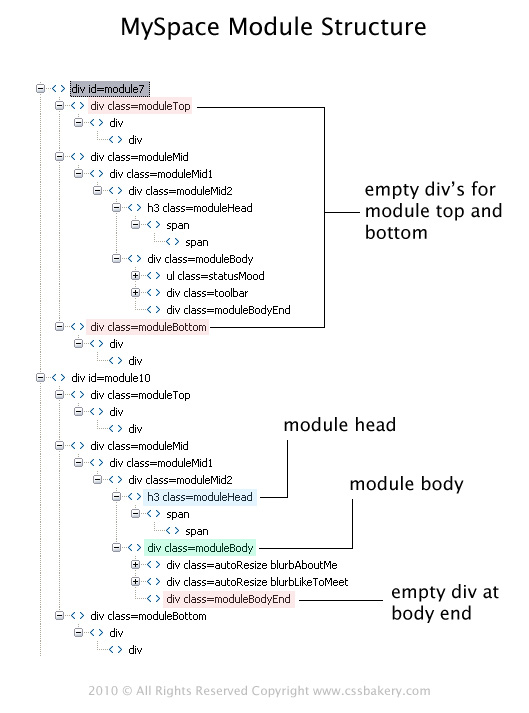
Each module has a single wrapper div that contains the entire module, and these will always have a unique id, such as "module7" that you see at the top of the diagram. At the next level down, there is a moduleTop, moduleMid, and moduleBottom. The moduleTop and moduleBottom are empty div structures. There is no content in them, but we can use these to style the modules using CSS. The module content is located in the moduleMid div. There are a couple of extra wrapper divs moduleMid1 and moudleMid2, then we come to moduleHead and moduleBody. moduleHead always has an h3 tag containing a couple of spans. Within the inner span you'll find the actual title of the module. Finally, within the moduleBody, you'll find the module-specific markup that differs for every module (notice the differences in the two module bodies shown in the diagram for module7 and module10 - one has a "statusMood" list, and a toolbar div, while the other has "blurbAboutMe" and "blurbLikeToMeet" div. So the moduleBody contents are totally different for different modules).


Post a Comment
Note: Only a member of this blog may post a comment.