


I have two files, main.php and register.php that I've been editing. I renamed their extensions to .txt so that you can view them here. If I had left them as .php's, they'll try to run when you click on the filenames. You'll see that they are nothing fancy, just an initial draft to get you started. So, now I'd like to show you how to execute those files. I told you my directory name at the beginning of the post. So, type into your browser:
"localhost/eclipseworkspace/projectX/main.php"
If I had named it "index.php" instead of main, then you could skip the filename. This code shows how you can validate the fields of the form in PHP, and give the user an error message if something is wrong. It works fine except for one problem: if there are multiple errors, such as a zero length username AND a zero length password, then only one error message is displayed to the user. In this case it's the password error message, since that check occurs later in the code.
To fix this, we can change the code to keep an array of error messages. Here's how we'll do that:
1. Instead of setting $error=false, lets instead create an empty array, and let's make the variable plural $errors instead of $error. Of course, you know that a compiler, or in this case the PHP interpreter, does not really distinguish between singular and plural form. It just helps make the variable names more meaningful for us:
$errors = array(); // create an empty array
Now, when we detect an error, instead of just assigning a string to $error, we will append the error string to the array. For example:
$errors[] = "Error: Please enter a username";
We make that same change for all other error messages. Note that we are making use of PHP syntax for appending to an array. That's where you have the array variable name followed by empty square brackets, like this: $arrayName[] = "string to append"
Now we need to change the test for whether we encountered any errors or not. Currently the code says:
if (!$error) {We change that to instead test whether there is anything in the array. If there is nothing in the array (count of elements is zero), then there were no errors:
if (count($errors)== 0) {
So far so good. Now the only thing remaining is to change the code that displays the error to the user. Here's what we've got right now. The PHP empty function will return true if your string is set to either FALSE, an empty string or an empty array or zero:
<?php // Old code to be removed:
  if (!empty($error)):?>
    <p class="error"><?php echo $error?></p>
  <?php endif;?>
Now we want to change that to:
<?php // New code:
  foreach($errors as $e):?>
    <p class="error"><?php echo $e?></p>
  <?php endforeach;?>
Note that we no longer have an if statement here. That's because in the case where there were no errors the array will be empty and we'll never execute the body of the foreach statement. On the other hand if there are one or two or more errors in the array, we will loop through them and display all of them one by one.
If you are not familiar with the PHP foreach syntax, it just provides an easy way to iterate over all the elements of an array. The loop starts with the first element in the array and continues with the next element until the end. Each time through the loop the value of the current element is assigned to the variable specified after the "as" ($e in the example code above). Basically says step through this array and for each element assign that value to my variable $e, then run the body of the loop.
There are certainly other ways you could code this loop. For example, this would be equivalent:
<?php for ($i=0; $i<count($errors); $i++):?>
    <p class="error"><?php echo $errors[$i]?></p>
  <?php endfor;?>
The syntax above will feel very familiar and comforting but although this form of the loop works, the former method is more bulletproof since it will work for any array no matter what the array keys are. In this case the keys happen to be integer values starting with 0 and incrementing, but PHP arrays are associative arrays, so you can do things like $myarray['banana']='yellow' and $myarray['apple']='red'. In such a case the former loop will still work, but the latter loop that depends on numeric keys will not.
For more on PHP foreach syntax, see here.
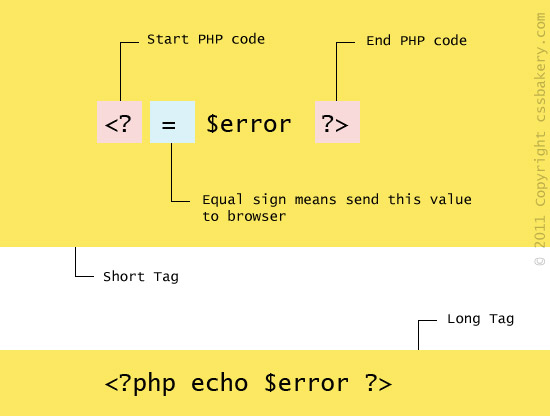
Note 1: A quick visual comparison of the long and short tags of PHP.
Note 2: The switching symbols used below to go between PHP and HTML making you queasy? Feels like a PHP-HTML-PHP carousel.
<?php
  if (!empty($error)):?>
    <p class="error"><?php echo $error?></p>
  <?php endif;?>
An alternative way to write this would be:
<?php
  if (!empty($error)):
    echo "<p class='error'>$error</p>";
  endif;?>
In this case where it's just one line of HTML to be output, that's not a bad way to do it. But when sending long stretches of HTML I think the format where you jump back and forth between PHP and HTML is the way to do. You end up with a file that looks more like HTML code with PHP sprinkled in, rather than an onslaught of PHP echo statements. That might be hard to visualize with just a small example like this, but if you code up an entire page you'll see what I mean.
The idea of echo'ing all output from a PHP program would be similar to writing a C program where you printf all the HTML. Come to think of it, you could actually write all this pure C. You could have an Apache module that links in your C code as a shared library. It would handle the TCP connection from the browser, doing printf's to send the HTML and other content to the browser. In other words, you'd be generating the HTML from your C program entirely. All the things that we are doing with PHP, you could do it with C instead in which case you would not need to switch between PHP and HTML. However, it'd be more complex. Say you needed to make a change, with PHP you just edit the file and you are done; with C, you have the extra step of compiling which will slow you down. Then you have to restart the web server process.


Post a Comment
Note: Only a member of this blog may post a comment.