


li.bar1 { background: url(../images/rainbow.jpg) 0 bottom no-repeat;
}
First case is straight forward, I specify (0, bottom) for the position which means to place the background image at the lower left corner of my li element at its lower left corner which will make the li element yellow. The red, blue and green parts of the image will not show at all because our li element is only wide enough for one single bar at 30 pixels.
We have an illustration for what happens in the next case. The position values are (-30px, bottom) which means "to shift" the image to the left by exactly 30 pixels and match the (-30px, bottom) point with the lower left corner of the li element.
li.bar2 { background: url(../images/rainbow.jpg) -30px bottom no-repeat;
}
This turns our li to a red bar.
As you can see in the middle figure, the entire image - meaning the four bars, 3 grey and one red - is actually below the li element but we are only showing the red portion using the positioning. The other three are not visible to the user. Our element is only 30 pixels wide which corresponds to a single bar width. Consequently the yellow, blue and green portions of the image are hidden.
To display the blue portion of the image, we need to shift over two bar lengths, which is 60 pixels to the left. li.bar3 will be blue.
.rainbow li.bar3 { background: url(../images/rainbow.jpg) -60px bottom no-repeat;
}
Finally for the green bar, we specify the position as 0, -90px to hop over three bar lengths.
li.bar4 { background: url(../images/rainbow.jpg) -90px bottom no-repeat;
}
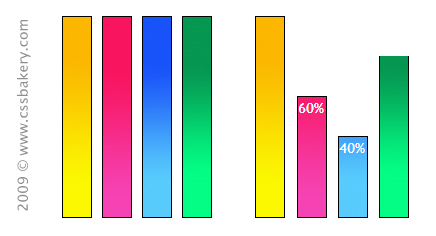
In addition to controlling the color of the bar, we can also determine its height to make these bars flexible. The image file is 200 pixels tall because 100 pixels was just not high enough for my graphs where I use these bars. So if you have a value of 80, then you'd want to multiply that by 2 to find its equivalent in this image file's context.
<ul>
<li class="bar1" style="height:200px">100%</li>
<li class="bar2" style="height:120px">60%</li>
<li class="bar3" style="height:80px">40%</li>
<li class="bar4" style="height:160px">80%</li>
</ul>
Initially the height of the li element was set to 200 pixels in the CSS which will be written over by the height statements in the HTML. The ability to reset the heights of the bars is what gives our code its flexibility. The first bar which is yellow is displayed in full length. 60% of the red, 40% of the blue and 80% of the green bar are displayed. The first four bars displayed at 100% are there to compare the full size bars to the new, shortened lengths. The second set of quadtuplets are obtained through the use of background shifting only.


Post a Comment
Note: Only a member of this blog may post a comment.